Turn your e-waste into a Kubernetes cluster! The UN is calling e-waste a big disaster for the environment and general health. Norwegians (like myself) as at the top of the list in terms of e-waste per capita. In 2022 154 000 tonnes of e-waste was recycled in Norway. That's about 28 kgs of e-waste per person. Among the e-waste are perfectly working laptops and smartphones that can be turned into a functioning server/cluster with a few steps.
There are many reasons to utilize your old hardware:
- Reduce E-waste: if you're like me, you probably have a few units of computing lying around at home. If you're planning to build a home lab, these computers might be sufficient to host the workloads that you desire without buying new hardware.
- Cloud costs and ownership of own data: the cloud is a remarkable technology in its own right. It's easy to set up and you don't need to maintain the physical machines running your software. When using the cloud, you will use computing power, and computing isn't cheap. Cloud costs can also bite you when "pay as you go" plans can rack up the bills when unexpected spikes in traffic occur.
- Power consumption and the environment: When refurbishing old computers instead of buying new ones, you prevent increasing the demand for computer chips in the world. When utilizing the cloud you take up compute resources that need to be supplied. This will in turn, also affect how data centers purchase new machines and new chips will be required.
Turning old laptops into servers
A home lab can come in many different variations and sizes. The simplest home labs run on consumer-grade machines that you already use, and the most advanced ones are comparable to enterprise-grade server setups. It's really what you make it to be. If you're like me, you probably have some old hardware dusting away in your home. In my case, I found 3 old laptops from my student years and early career. They pack the same punch as many modern single-board computers and I think it's a shame that these computers go un-utilized. Let's put them to use and make ourselves a home lab!
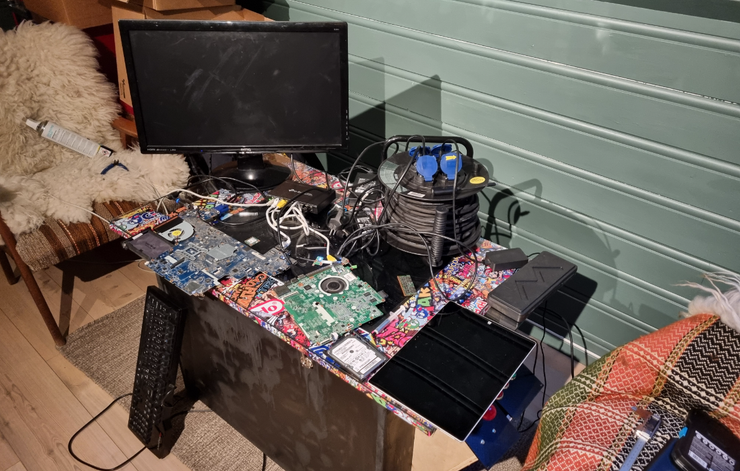 This was my rig for a little while! A true MacGyver setup! Don't worry, I'll clean it up later...
These are the laptops (victims) in question:
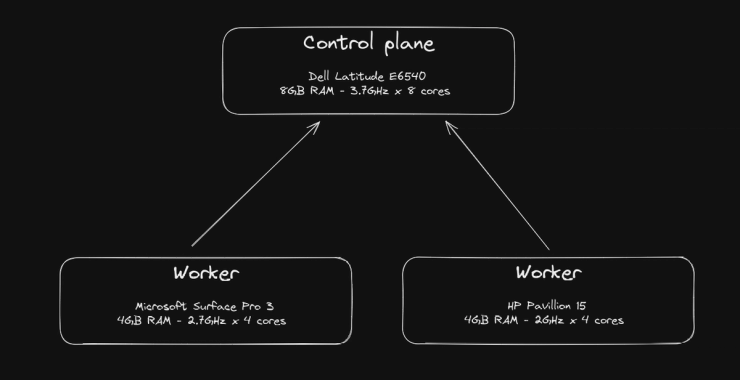
- Dell Latitude E6540: 8 GB DDR3L SDRAM (1600 MHz), Intel i7-4800MQ (8) @ 3.700GHz, 2.5-inch 128 GB Class 20 SSD
- HP Pavillion 15: 4 GB 1600 MHz DDR3L SDRAM, AMD A8-6410 APU with AMD Radeon R5 Graphics (4) @ 2.000GHz
- Microsoft Surface Pro 3: 4 GB 1600 MHz DDR3L SDRAM, Intel i5-4300U (4) @ 2.900GHz, 128 GB SSD
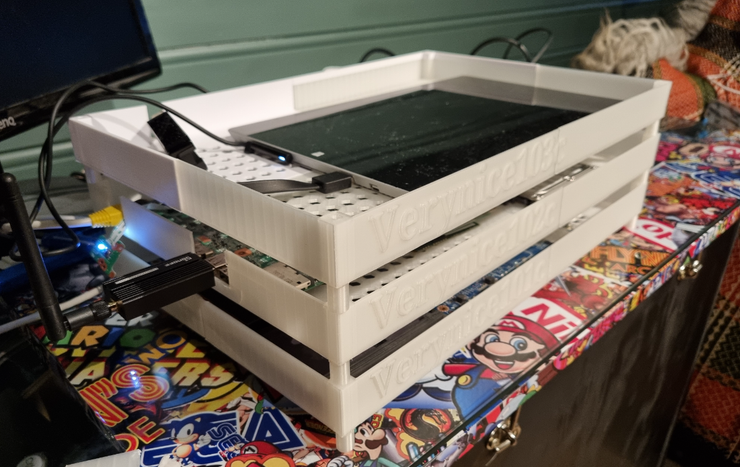
I initially wanted to keep the hardware of the laptops untouched and merely focus on the software aspect, but I wanted to fit these into a server rack so I removed their guts and shoved them into a 3d printed case.
BIOS settings
Before setting up the machines it's a good idea to update the BIOS. This is generally easier to do on Windows as it is better supported.
- We want to be able to boot the machines up as soon as they start to draw power. Many BIOS allow this with the setting, "Wake on AC". If you have healthy batteries you can use them as a reserve power supply in case of power outages.
- Make sure to set a maximum of 80% in the BIOS for better battery health and longevity, or even remove the battery altogether.
Install the OS of choice and settings
The choice of OS is up to you. I will be running Ubuntu Server 22.04.
Disable lid
If you choose to keep the case for the laptop you might need to turn off some of the behavior of the lid. This is easy with a couple of settings in Ubuntu. To disable these settings we need to run a few commands.
sudo systemctl unmask sleep.target suspend.target hibernate.target hybrid-sleep.target
Edit sudo nano /etc/systemd/logind.conf as follows.
[Login]
HandleHibernateKey=ignore
HandleLidSwitch=ignore
HandleLidSwitchExternalPower=ignore
HandleLidSwitchDocked=ignore
Run systemctl restart systemd-logind and reboot.
Disable screen
The Surface Pro is the only laptop (tablet) that I will not disassemble due to its already small form factor and notoriously painful disassembly process. In this case, I don't want the screen to draw power. I threw in some GRUB config to make the screen turn off after a couple of minutes.
Edit the GRUB config sudo nano /etc/default/grub and edit the property GRUB_CMDLINE_LINUX_DEFAULT as follows.
GRUB_CMDLINE_LINUX_DEFAULT="consoleblank=300"
Run sudo update-grub and reboot.
Ethernet dongle
The Surface Pro doesn't have an ethernet port. I bought an ethernet dongle and activated it in the netplan file. Run the following command to see the list of network devices.
lshw -class network
I see my dongle in the list of devices as the following entry.
  *-network
       description: Ethernet interface
       physical id: 8
       bus info: usb@2:1
       logical name: enx7cc2c64cbb91
       size: 1Gbit/s
       capacity: 1Gbit/s
       capabilities: ethernet physical tp mii 10bt 10bt-fd 100bt 100bt-fd 1000bt 1000bt-fd autonegotiation
Jot down the logical name of the device and edit the netplan config sudo nano /etc/netplan/00-installer-config-wifi.yaml as follows.
# This is the network config written by 'subiquity'
network:
  ethernets:
    enx7cc2c64cbb91:
      dhcp4: true
  version: 2
We need to generate and apply the netplan with the following commands: sudo netplan generate and sudo netplan apply. Reboot for good measure.
Reduce power draw
By peeling away the screen and the case you can reduce some of the power drawn in terms of keeping the thermals down. Remove devices like wifi and Bluetooth if they're not integrated.
If removing the components physically is impossible or hard, it's easy to disable these using a package called TLP. This is a service designed to reduce power consumption on laptops. It's based on Intel's Powertop which is a diagnostic tool to analyze the power consumption on a laptop and in turn uses Intel’s Running Average Power Limit (RAPL) to measure. The TLP service will configure a series of recommended steps to reduce power draw and will run in the background to keep the power consumption down.
Installation
sudo apt-get update -y
sudo apt-get install -y tlp

sudo systemctl enable tlp.service
sudo systemctl start tlp.service

sudo bluetooth off
sudo wifi off
We'll explain more about how we measure the power consumption in Kubernetes further down.
Install k3s
Why Kubernetes? I thought it made sense on a logical level. Several underpowered computers clustered together to make a powerful computing unit. Kubernetes bundles together a lot of responsibilities for delivering containerized applications. It provides a declarative way to deliver applications across nodes based on metrics.
We're going to structure our cluster with one control plane and two workers. This is the setup that uses the least amount of resources. This is not as high availability as when setting this up with three control planes, but we're prioritizing the resourcefulness for now. Here's a graph showing the relationships between the machines in this cluster.
It's time to install k3s. K3s is a lightweight version of Kubernetes that's designed to run on lightweight devices. Installing k3s is very easy. It's just one command to get up and running.
curl -sfL https://get.k3s.io | sh -
This takes about 30 seconds to run and will set up your machine as a k3s node! This command is also configurable to suit your needs. We're going to install one server node and two worker nodes. We will disable Traefik and ServiceLB and replace them with Cloudflared and MetalLB.
Uninstall k3s using /usr/local/bin/k3s-uninstall.sh and run the command again with the appropriate settings.
curl -sfL https://get.k3s.io | sh -
  \ --disable servicelb
	\ --disable traefik
Note down the contents of the K3S_TOKEN stored at /var/lib/rancher/k3s/server/node-token and SSH into the other machines that will run as worker nodes. Run the following command.
curl -sfL https://get.k3s.io | K3S_URL=https://ip-address-of-server:6443 K3S_TOKEN=mynodetoken sh -
  \ --disable servicelb
	\ --disable traefik
Installing applications
We're going to install some applications to run internally and some applications to be exposed to the Internet. This is a list of applications that are currently running in my home lab. See the full configuration of the cluster on Github.
Internal services:
- AdGuard Home
- Monitoring with Prometheus with exporters for speed test (internet speed), blackbox (uptime), and Kepler (power consumption). Displayed with Grafana, a visualization UI.
External services:
- Personal blog
- Home assistant configured with Zigbee dongle
GitOps with Flux
Before we start looking at the separate applications, we need to look at how we want to manage them. One way to do this is to store all the manifests in a git repository and use Flux to link the repository to the cluster. This helps us declare manifests and Helm packages in YAML and automatically link the manifests to a cluster with a few commands.
Install flux and link your git-repository containing manifests to your cluster using flux with the following command.
flux bootstrap github --owner=MyUser --repository=my-cluster-repo --path=path/to/cluster/env --personal
# I set my path to ./ as I only have one home lab
Replace ServiceLB with MetalLB
I mentioned earlier that we disabled ServiceLB in the initialization of the cluster. We will instead use MetalLB in place to have more configurability. This will allow us to use L2 networking.
Configure the MetalLB IPAddressPool and L2Advertisement like this:
apiVersion: metallb.io/v1beta1
kind: IPAddressPool
metadata:
  name: k3s-lb-pool
  namespace: metallb-system
spec:
  addresses:
  - 192.168.1.10-192.168.1.30
---
apiVersion: metallb.io/v1beta1
kind: L2Advertisement
metadata:
  name: k3s-lb-pool
  namespace: metallb-system
Exposing services to the internet with Cloudflare tunnels
We're going to use Cloudflare tunnels to tunnel services to the DNS and ultimately the internet. This is a way to tunnel applications to the internet without opening any ports on your local network. Provided that you have created a Cloudflare account and cloudflared cli installed, setting up a tunnel is surprisingly easy.
cloudflared tunnel create example-tunnel
This tunnel is the only one we need to configure and we can pipe all services we want to expose through the same tunnel. The command will create the credentials on the disk that we need to upload to the k3s cluster.
kubectl create secret generic tunnel-credentials \
--from-file=credentials.json=/.cloudflared/ef824aef-7557-4b41-a398-4684585177ad.json
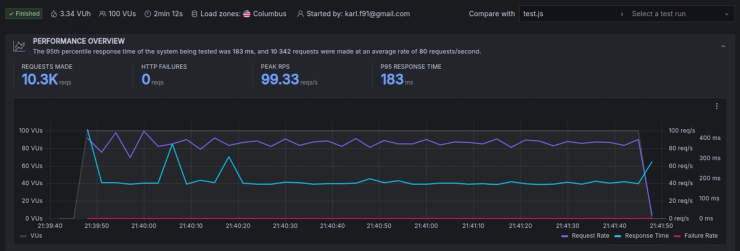
How does this perform? I tried to nuke my blog using the k6 load-testing tool. 10.3K requests were made in 2 minutes with an average response time of 164 ms and 0 failures. Latency might be because of tests being run from the US and my home lab being located in Norway. The blog has 2 replicas, limits 128Mi memory and 500m CPU.
Monitoring power consumption with Kepler
Kepler (Kubernetes-based Efficient Power Level Exporter) is a Prometheus exporter. It uses eBPF to probe CPU performance counters and Linux kernel tracepoints. altogether
This tool breaks down the power consumption per service and monitors the usage over time. This allows us to make changes to the cluster and see the power impact of our actions. Kepler has a pre-configured dashboard to visualize the power draw for workloads and namespaces. Kepler has pre-configured dashboards in Grafana.
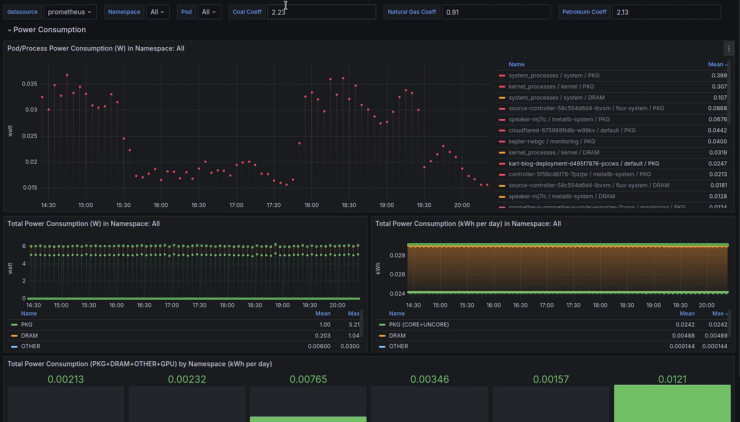
This cluster seems to running on an average of 0.03 kWh. That would equate to a monthly cost of 16,5 NOK (1,52 USD) given a kWh rate of 0,767 NOK (0,07 USD). Just for fun and in the spirit of comparing apples to oranges, the minimal "free" tier to an AKS cluster would be a monthly cost of 35,34 USD (1 VM, 4 GB RAM).
Conclusion
This setup is enough to get me started in the self-hosting world and to continue to sharpen my Kubernetes skills. I hope I've inspired some of you to try this approach on your own and that you gain the bragging rights of having a Kubernetes cluster at home. This have been a great way to learn. I will keep on working with this home lab and do more write-up on this topic.
Resources: