 I used to dislike Angular a bit. Angular was one of those frameworks that were easy to recognize. I never felt like I was writing "real" JavaScript when I wrote Angular. Your applications became Angular applications. And those applications felt large and clumsy. Good for when you're making something that uses a lot of Angular features, not so good for when only what to use it for a small module. So how is the new Angular 2.0?
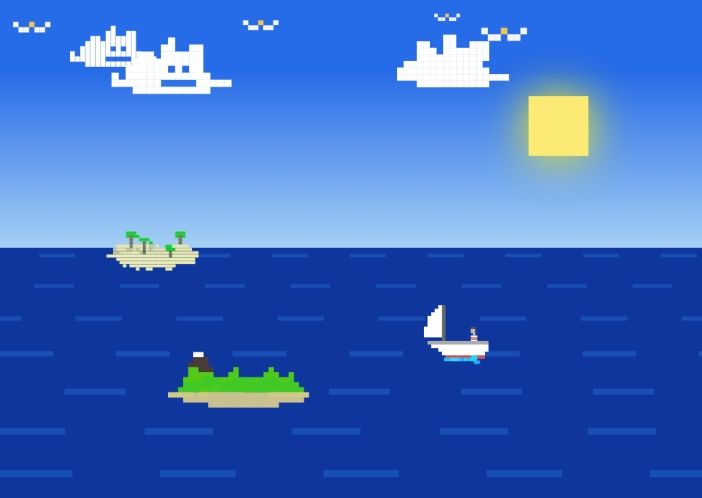
Lets create something! As summer comes to an end, we like to remember the good times at sea. So lets make a sail boat and an ocean with randomly generated content like clouds, fish and islands.
<p data-height="436" data-theme-id="0" data-slug-hash="VjBELQ" data-default-tab="result" data-user="CosX" data-embed-version="2" class="codepen"></p> <script async src="//assets.codepen.io/assets/embed/ei.js"></script>
TypeScript and modules
I followed the basic guide on the Angular website. I used SystemJS as a module loader. I'm sure you can use browserify or webpack if that's your preferred module loader. Here I'm essentially setting up a watcher on my files, pipe the code through a TypeScript transpiler (tsc) and bundling it all together. We also have a local web server that keeps the application alive on your development computer. It requires some setup, but that is relatively normal in concurrent applications. You can also set Angular 2.0 up without any transpiling or magical jazz.
Animating the ocean
Probably the least complex part of this solution. I draw a sky and an ocean in CSS. The ocean has some "parallax" effects with waves. Here's the demo with CSS highlighted.
Creating some models
One of the clear benefits of TypeScript is declaring types. And with larger application it becomes an advantage to introduce a type system to your JavaScript. Here we specify a couple of types.
//./models/element.ts
class Element {
    classname: string;
    zoom: number;
    zindex: number;
    velocity: number;
    x: number;
    y: number;
}

//./models/spawn.ts
class Spawn {
    classname: string;
    rarity: number;
    direction: Direction;
    totalclasses: number;
    ticker: number;
}

enum Direction {
    Upper,
    Lower,
}
Here we have some types. Spawn will tell the application what to spawn and how to spawn it. For example an island will not spawn as often as a cloud. The Direction of an island would be on the lower part of the screen, where the water is.
Element is the result of the Spawn. A Spawn will create many elements. An element is what Angular will parse as HTML and animate. An Element will get altered during the runtime of the application.
Starting point of the application
We need to initialize the code! And with a bootstrap method, that is fairly easy.
import { bootstrap }    from '@angular/platform-browser-dynamic';
import { AppComponent } from './app.component';
bootstrap(AppComponent);
Great, but what are we bootstrapping here? We're setting up our main component. This is where all the spawns are defined and the application is contained.
import { Component } from '@angular/core';
import { SpawnComponent } from './app.spawner';
import { Spawn, Direction } from './models/spawn';

const clouds: Spawn = {
	classname: 'cloud',
	rarity: 0.5,
	direction: Direction.Upper,
	totalclasses: 4,
	ticker: 1.5
};

const islands: Spawn = {
	classname: 'island',
	rarity: 0.3,
	direction: Direction.Lower,
	totalclasses: 5,
	ticker: 4
};

const seagull: Spawn = {
	classname: 'seagull',
	rarity: 0.4,
	direction: Direction.Upper,
	totalclasses: 1,
	ticker: 2
};

const fish: Spawn = {
	classname: 'fish',
	rarity: 0.2,
	direction: Direction.Lower,
	totalclasses: 1,
	ticker: 3
};

var date = new Date().getHours();

@Component({
  selector: 'my-app',
  template: `
  <div id="sun"></div>
  <div id="sky" *ngIf="isNight" style="background: linear-gradient(#B48170 30%, #FD9F23)"></div>
  <div id="sky" *ngIf="!isNight"></div>
  <div id="sea">
  	<div class="ripple duration-1"></div>
  	<div class="ripple duration-2"></div>
  	<div class="ripple duration-3"></div>
  	<div class="ripple duration-4"></div>
  	<div class="ripple duration-5"></div>
  	<div class="ripple duration-6"></div>
  	<div class="ripple duration-7"></div>
  </div>
  <div id="boat">
  	<div id="person"><div id="wave"></div></div>
  </div>
  <div *ngIf="isNight" id="overlay"></div>
  <spawner [spawn]="clouds"></spawner>
  <spawner [spawn]="islands"></spawner>
  <spawner [spawn]="seagull"></spawner>
  <spawner [spawn]="fish"></spawner>
  `,
  directives: [SpawnComponent]
})
export class AppComponent {
	clouds = clouds;
	islands = islands;
	seagull = seagull;
	fish = fish;
	isNight = date > 19 || date < 4;
}
Alas! Here we have some interesting stuff. The way Angular declares a view, is with a decorator called @Component. Here you declare the selector you want the application to render in, the template and other directives you might want to include in the component. The template can also be put in to a different file with templateUrl if that's preferable. The class AppComponent contains all the code that the application needs to render. By decorating the component you can focus on writing logic specific for your application without worrying about Angular itselves. We also have some logic to render the scene as night or day based on the time.
Spawning stuff
Now we need to spawn some stuff. Islands and clouds... among other things. Some things spawn more frequently and quicker than others. Our AppComponent consists of a few tags. I've defined these as <spawner>. This module will spawn a type of element with a class name. In the CSS we'll postfix our class names with numbers declaring the total number of classes that we want to randomize from. So the class name island that has 4 total classes will have the CSS classes "island1, island2, island3, island4". Our stuff will be styled and animated with CSS and CSS transitions.
import { Component, Input, OnInit } from '@angular/core';
import { NgStyle } from '@angular/common';
import { Spawn, Direction } from './models/spawn';
import { Element } from './models/element';

var w = window.innerWidth;
var h = window.innerHeight;

window.addEventListener('resize', () => {
  w = window.innerWidth;
  h = window.innerHeight;
});

const rand = (start: number, stop: number) => {
  return Math.floor(Math.random() * stop) + start;
}

const convertRange = (value, r1, r2) => {
  return ( value - r1[ 0 ] ) * ( r2[ 1 ] - r2[ 0 ] ) / ( r1[ 1 ] - r1[ 0 ] ) + r2[ 0 ];
}

@Component({
  selector: 'spawner',
  template: `
  <div class="container" *ngFor="let el of elements">
    <div class="{{el.classname}}" [ngStyle]="{'left':el.x, 'top':el.y, 'zoom': el.zoom, '-moz-transform': el.scale, 'z-index': el.zindex}"></div>
  </div>
  `,
  directives: [ NgStyle ]
})
export class SpawnComponent implements OnInit {
  @Input()
  spawn: Spawn;
  elements: Element[] = [];

  ngOnInit(){
     setInterval(this.generate.bind(this), this.spawn.ticker * 1000);
     window.requestAnimationFrame(this.frame.bind(this));
   }

   private frame(){
     var eliminations: number[] = [];
     this.elements.forEach((el, i) => {
       el.x += (1 * el.velocity);
       if(el.x > w){
         eliminations.push(i);
       }
     });

     eliminations.forEach(i => this.elements.splice(i, 1));
     window.requestAnimationFrame(this.frame.bind(this));
   }

   private generate(){
     if(this.spawn.rarity < Math.random()){
         var r = Math.random();
         var z = convertRange(2 - r, [1, 2], [0.9, 2]);
         var v = convertRange(r + 1, [1, 2], [1, 3]);
         var initpoint = 0;
         if(this.spawn.direction === Direction.Lower){
           initpoint = h/2 - 50;
           v = convertRange(2 - r, [1, 2], [0.4, 6]);
         }
         if (z < 1.4 && z > 1.05){
           z = 1.4;
         }

        this.elements.push({
          classname: `${this.spawn.classname}${rand(1, this.spawn.totalclasses)}`,
          y: initpoint,
          x: -100,
          zoom: z,
          velocity: v,
          zindex: Math.floor(z*10000)
        });
      }
   }
}
This code will progress the animation of a spawn. It will decide a velocity, position and animate that fixture until it runs off screen. After it runs off the screen, it will be destroyed. The animation is looped with requestAnimationFrame and rendered by Angular 2.0. The interesting bits here are the OnInit and how Angular treats styles with ngStyles. OnInit will inherit a method called ngOnInit(). This will run when the component is initialized. A useful and obvious method! ngStyles is the way Angular processes styles and is treated with a JSON. Everything is built up on modules and that's wonderful!
I like it!
All in all, I like the new Angular so far! It's somewhat cleaner than the previous installment. It allows me to to write more modular code and it all feels like it's less dependent of Angular on its own.