As a follow-up to the build of my Laptop Cluster, I went about building a NAS from both practical and educational standpoints. This was to be used as a storage device for my Kubernetes Cluster, basically having shared storage on devices on my network. This actually provided a good opportunity to try out several storage solutions, network sharing protocols, and integration with Kubernetes.
Setup the Raspberry Pi

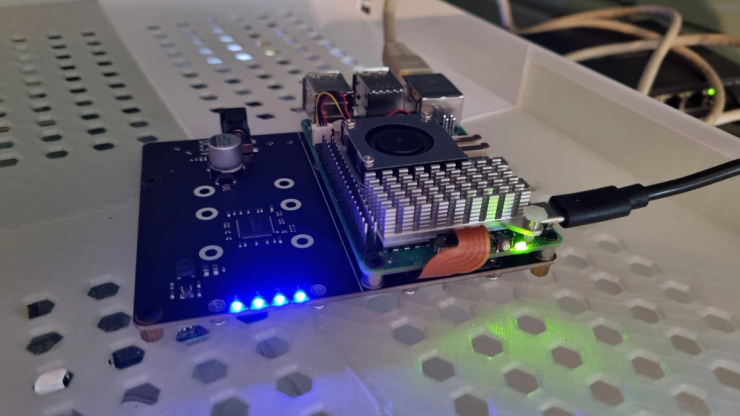
Assembly of the Raspberry Pi and Geekworm X1011 is relatively easy. The Geekworm X1011 board is what you need to attach several NVMe drives to a Raspberry Pi, converting it into a low-cost and small in size NAS solution.
-
Flash the SD Card: Download the Raspberry Pi OS (Lite) and flash it to an SD card using a tool like Raspberry Pi Imager. The Lite version will be enough to serve our needs, as we wouldn't need a desktop environment.
-
Install OpenMediaVault: OpenMediaVault or OMV in short is a very capable open-source NAS solution. You can easily install it on your Raspberry Pi using the following one-liner:
wget -O - https://raw.githubusercontent.com/OpenMediaVault-Plugin-Developers/installScript/master/install | sudo bash
- Create the Admin User: Once installed, access the OMV web interface, typically at
http://<your-raspberry-pi-ip>, using the default credentials to log in before you create a new admin user and change the default password for security reasons.
Choosing the Disk Configuration
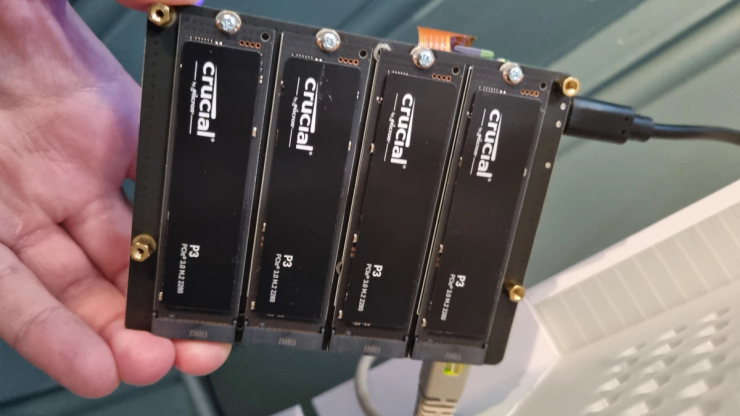
Currently, I have connected four 1 TB Crucial P3 NVMe drives to the X1011 board. For managing such storage, I went with ZFS since it's really feature-rich concerning data integrity and quite flexible in general. I have used RAIDZ1, providing redundancy level equal to RAID 5, meaning I could lose one drive without facing data loss. This setup gave me about 2.7 TB of usable storage space with redundancy.
To manage ZFS on OpenMediaVault, I used the openmediavault-zfs plugin, which provided a simple way of creating and managing, and monitoring ZFS pools and datasets.
ZFS Pool Configuration
- Install ZFS Plugin: In the OMV web interface, navigate to "Plugins," search for
openmediavault-zfs, and click "Install.". - Create ZFS Pool: Within the OMV interface, navigate to "Storage > ZFS," then click "Create > ZFS pool." After you have selected the four NVMe drives, you configure the RAIDZ1 configuration. You can name your pool - for example,
tank.
Change the Raspberry Pi Configuration after Suspended Drives
I had some problems with suspended drives. I got the following logs:
[65668.314192] nvme nvme1: controller is down; will reset: CSTS=0xffffffff, PCI_STATUS=0xffff
[65668.314200] nvme nvme1: Does your device have a faulty power saving mode enabled?
[65668.314203] nvme nvme1: Try "nvme_core.default_ps_max_latency_us=0 pcie_aspm=off" and report a bug
The problem I had was, after a few hours of running,the drives would go into suspend mode, and make the NAS unavailable.
Below is what you'll need to add at the bottom of that file to have PCIe Gen 3.0 mode enabled:
[all]
dtparam=pciex1_gen3
This forces the RPi to use PCIe Gen 3.0 and seems to resolve the stability issues and increased the speed of my NAS setup. Special thanks to [this anonymous comment](https://wiki.geekworm.com/NVMe_SSD_boot_with_the_Raspberry_Pi_5#comment-4433 for this pointer.
NFS and Connecting to a Kubernetes Cluster
To integrate this NAS with my Kubernetes cluster, I decided to use NFS. NFS is rather easy to set up on OpenMediaVault and provides a reliable way of sharing storage across multiple devices and servers.
Setting Up NFS on OpenMediaVault
- Enable NFS Service: In the OMV web interface, go into "Services > NFS", enable the NFS service, and create a new shared folder, say,
/k8s. - Configuring Shared Folders: Create the NFS share with intended permissions. Make sure your Kubernetes nodes have access to the NFS share by adding the IP addresses of the nodes in the list "Clients" and grant the corresponding read/write permissions.
Configuring the Kubernetes Cluster
To make Kubernetes use the NFS storage, we will have to deploy the NFS CSI driver and create a Storage Class.
Installing the NFS CSI Driver
Apply the following Helm commands to install the NFS CSI driver:
helm repo add csi-driver-nfs https://kubernetes-sigs.github.io/nfs-subdir-external-provisioner/
helm repo update

helm upgrade --install csi-driver-nfs csi-driver-nfs/csi-driver-nfs --version v4.7.0 --namespace kube-system
Or automate with Flux CD with the following HelmRelease manifest:
apiVersion: helm.toolkit.fluxcd.io/v2
kind: HelmRelease
metadata:
  name: csi-driver-nfs
  namespace: kube-system
spec:
  interval: 5m
  chart:
    spec:
      chart: csi-driver-nfs
      version: "v4.7.0"
      sourceRef:
        kind: HelmRepository
        name: csi-driver-nfs
        namespace: flux-system
      interval: 5m
Step 2: Create a Storage Class
Create a manifest for a Storage Class that provides the declaration to Kubernetes about the usage of NFS-based storage:
apiVersion: storage.k8s.io/v1
kind: StorageClass
metadata:
  name: nfs-csi
  annotations:
    storageclass.kubernetes.io/is-default-class: "true"
provisioner: nfs.csi.k8s.io
parameters:
  server: <your-nfs-server-ip>
  share: /k8s
reclaimPolicy: Delete
volumeBindingMode: Immediate
mountOptions:
  - nfsvers=4
  - hard
  - timeo=600
  - retrans=3
  - proto=tcp
  - rsize=32768
  - wsize=32768
  - noacl
  - nocto
  - noatime
  - nodiratime
Replace <your-nfs-server-ip> with the IP address of your Raspberry Pi NAS. This will define a Storage Class called nfs-csi that Kubernetes can use to provision PersistentVolumes behind the NFS share.
Step 3: Consuming the Storage Class in PVC
Now that the Storage Class is defined, you can start consuming it in your PersistentVolumeClaims to provide your applications with NFS-backed storage. Following is a sample manifest for a PVC:
apiVersion: v1
kind: PersistentVolumeClaim
metadata:
  name: adguard-pvc
  namespace: default
spec:
  accessModes:
    - ReadWriteOnce
  resources:
    requests:
      storage: 1Gi
  storageClassName: "nfs-csi"
Create the above manifest in your Kubernetes cluster, and it will deploy a 1Gi NFS-backed PersistentVolume for the adguard application.
Conclusion
Resources:
In this project, you will have set up a Raspberry Pi NAS with OpenMediaVault, set up ZFS for reliable storage, and connected it to your Kubernetes cluster using NFS. More than just being a functional piece of storage, this would serve great for learning exercises on managing storage infrastructure, integrating with Kubernetes, and optimization of performance.